Chair yoga
Chair pose is a defiance of spirit, showing how high you can reach even when you’re forced down. ―Terri Guillemets
👥 Serves: 1 person, 11-25 people, 2-10 people, 26-40 people, 41+ people
🎚 Difficulty: Easy
⏳ Total time: 11-30 minutes
🥣 Ingredients: A sturdy chair, comfortable clothes
🤓 Wholebeing Domains: Awareness, Ritualising
💪 Wholebeing Skills: Embodiment, Exercising, Focus, Mind-body-connection, Mindfulness, Movement

Chair yoga
📝 Description
Using a chair to stretch and flex your body.
Chair yoga is a form of yoga as therapy developed by Lakshmi Voelker-Binder in 1982 and is practiced sitting on a chair or standing using the chair for support. If you spend long hours sitting in front of a computer, chair yoga is a good way to stretch and flex your body because it requires minimal equipment (a chair and possibly comfy clothes). It is also suitable for people with limited mobility or physical disabilities because the chair offers extra support. Wear comfy clothes, grab a chair, and practice chair yoga for 10-15 minutes!
👣 Steps
Step 1 – Sit at the edge of the chair
Sit up tall at the edge of your seat and place your hands on your waist. Take a few deep breaths.
Step 2 – Cat–cow
Place your hands on your knees and the next time you inhale, arch your back and look up at the ceiling (cow). When you exhale, pull your abdominals in and round your back (cat). Repeat this movement 5 times following your breath to relieve tension in the back and neck.
Step 3 – Urdhva Hastasana (Chair raised hands pose)
Come back into neutral position, with your spine long and tall. The next time you inhale, raise your arms towards the ceiling. Hold for a few seconds before lowering them when you exhale. Repeat this movement 5 times.
Step 4 – Sun salutations arms
On an inhale, lift your arms up again, this time pressing your palms together over your head. Look up at the ceiling. On an exhale, float the arms back down to your side. Repeat this movement 5 times.
Step 5 – Back twists
On an inhale, lift your arms up again, then twist to the right, placing your left hand against the right thigh and grabbing the back of the chair with the right hand. On an exhale, come back to the centre, lifting your arms up again, then twist to the left, placing your right hand against the left thigh and grabbing the back of the chair with the left hand. Repeat 5 times on each side. When you have finished, lower the arms to the side of the body.
Step 6 – Neck stretch
Place your left hand on the left side of the chair, take your right arm and drape it over your head and apply a gentle pressure to let your head fall towards your right shoulder, stretching the neck on the left. Hold for 5 breaths, then repeat on the opposite side. Then interlace your fingers behind your head and apply a gentle pressure to bring your chin towards your chest and stretch the back of the neck.
Step 7 – Uttanasana (Chair forward bend)
Inhale and lift your arms up, then on an exhalation, come into a forward bend over the legs. If possible, let your hands rest on the floor and let your head hang heavy. Rest in this pose for a few breaths. To come out, straighten the arms in front of you over the head and come up. Repeat three times in total and on the last forward bend, stay folded.
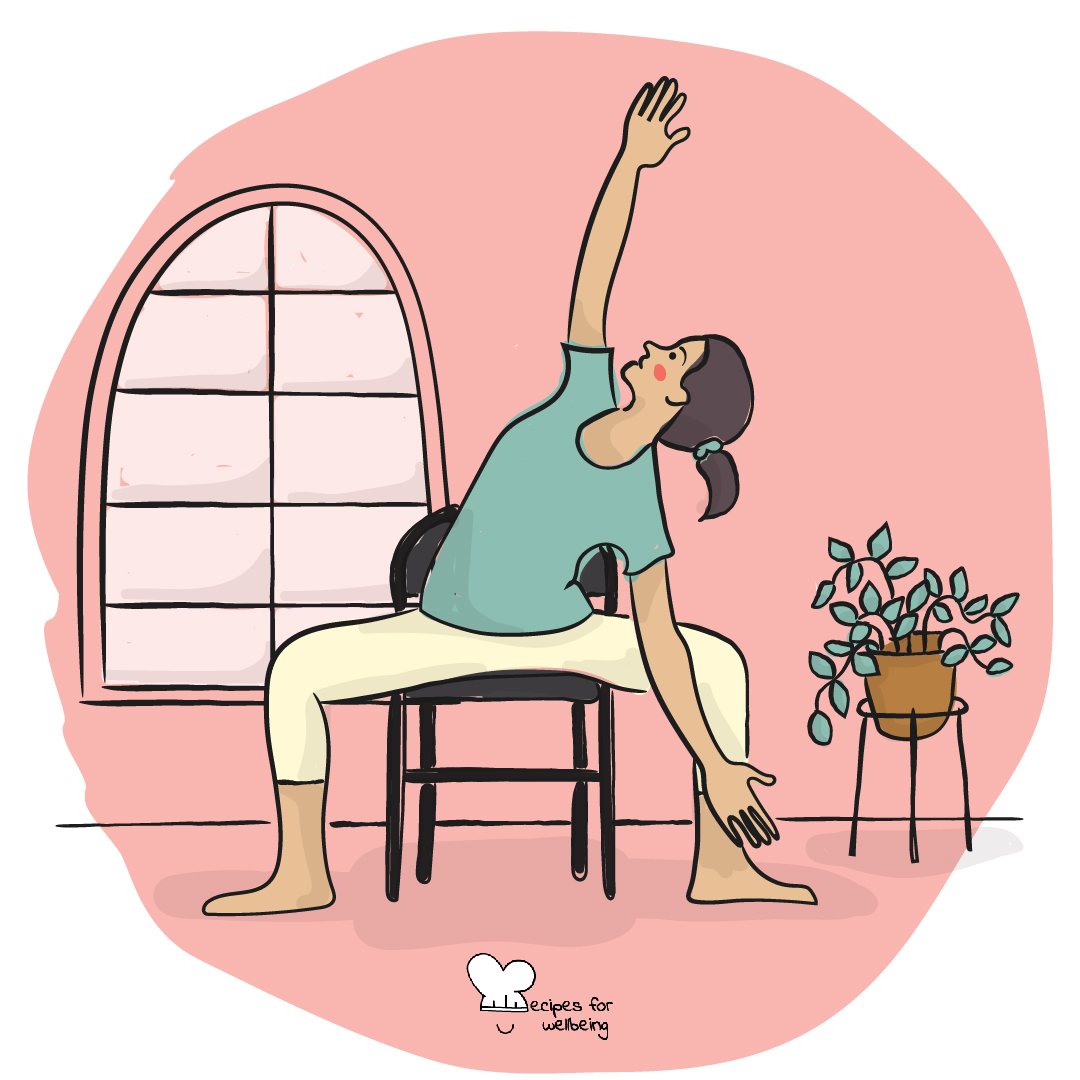
Step 8 – Utthita Parsvakonasana (Chair Extended Side Angle)
Place your left hand in between your feet. Open your chest as you twist to the right on an inhale, lifting your right arm up and looking up at the ceiling. Hold here for several breaths before bringing the right arm down on an exhale. Repeat on the other side. If you struggle to reach the floor with your hand, use a block (or a thick book) to give you extra height.
Step 9 – Eka Pada Rajakapotasana (Chair pigeon)
Come back up to sit. Now, lift your right leg and bring your right ankle to rest on your left thigh, trying to keep the knee in line with your ankle (as much as possible). If you would like to deepen the stretch, you may place your forearms on the right leg to push it further down. Hold for a few breaths before repeating on the other side.
Step 10 – Goddess with a twist
Now open your legs wide and point your toes out. Place your right arm against the inner right thigh, reaching towards the floor. Lift your left arm toward the ceiling and gaze up to your left hand. Hold for five breaths, then repeat on the other side.
Step 11 – Savasana (Final relaxation)
Return to a sitting position with your back straight but relaxed. Place your hands on your lap and close your eyes. Take a moment to relax and let your body absorb the benefits of this practice. When you are ready, gently open your eyes.